
Forms form the basis of web based interactivity. Forms are the primary way websites collect information from users. Once the information is gathered, there is little HTML can do with it on its own. Usually the collected information is checked for errors using Javascript and then passed up to the server. The server uses a script to parse, process, respond to and store the information. The form on the client side creates the interface that your visitors will use to communicate with you.
Forms are the primary way information is gathered and passed from users to the server. They represent one of the most widely used methods of creating customized web applications. It's hard to imagine the Web without forms.
We have grown so accustomed to using form elements in web pages that we don't even notice them for what they are any longer. Some of the most common uses of web forms include:
Forms are relatively easy to code, yet difficult to design well. The HTML that creates all the form elements is quite straightforward. The form elements provide simple, familiar tools for the user to input information. There is a small but powerful collection of form elements. Together they make up the front-end interface for forms. They include:
Forms use these controls to collect user input. Usually the input is validated using JavaScript before it is passed up to the server to be parsed and processed. There, the server uses server-side scripts to decide how to handle the input depending on how the form was intended to be used. The writing of these scripts is beyond the scope of this course, but in this module we will explore the client side of making usable forms.
The basic elements of a form are relatively simple HTML tags. The information is gathered from the user and passed to the server. The server needs to use a script of some kind in order to process the information it receives. The script can be written in any language the developer favors. Some of the most commonly used languages are Perl, Java, Ruby, PHP and Cold Fusion. The form tag references the script and the script does the work of sorting, formatting, and directing the data to where it should go.
With a good script you can do all kinds of things with your data. The interface between HTTP, which is responsible for the transaction and the script that is being called, is referred to as the Common Gateway Interface, or CGI. The scripts are stored in a folder on the server. By convention the folder is called "cgi_bin". If you are a designer you may not want to/have to write your own scripts. Fortunately, there are many services available for free on the Web. If you need something special you can always hire a programmer, or learn to code them yourself. Your ISP (Internet Service Provider) probably has a number of pre-written ones available for your use. It's worth checking with them to find out. Sometimes they have message boards and email programs available at no extra charge.
An excellent resource is Wufoo.com. This site provides a drag and drop interface for creating forms that it can attach scripts to as well host. It's also a great example of Web 2.0 design. Check it out at: http://wufoo.com/
The best way to learn how to build a form is to just go ahead and build one. We are going to write a form that allows people to talk about their pets.
Duplicate your template folder and name the copy "m8_yourlastname". Open up your template page and go to File > Save As and resave the file as m8_form1_yourlastname.html
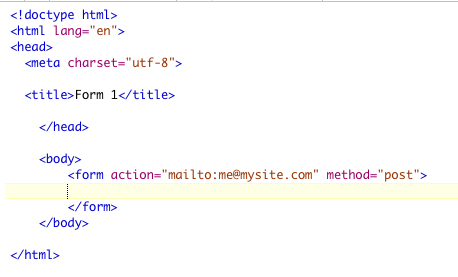
The first step in making a form is declaring a form. The form tag wraps completely around all the controls used in the form. The form tag has a number of attributes, the most important of which are "action" and "method".
The "action" attribute points to the script that the server will use to process the form. It is the URL to the script. It could look like this:
action="cgi_bin/guestbook.php"
If you just want to have the data sent to your email address with no formatting you can always just use your email address as the action. For the purposes of this module you can send your forms to your own email address. The code will look something like this:
action="mailto:me@mysite.com"
The method attribute has two values:
The method specifies how the information is transferred to the server. The information is transferred in the form of "name=value pairs". The pairs are separated by "&". A series of "name=value" pairs looks like this:
dogName=fido&dogBreed=whippet&favoritefood=kibble
The GET method appends the "name=value" pairs to the end of the URL when the form is submitted. As a result it is visible to everyone while it is being passed. This is fine for short variables that are not sensitive, but you may think twice about asking people to send their credit card numbers, exposing them to prying eyes. An example of a GET method looks like this:
https://www.google.com/search?hl=en&ie=ISO-8859-1&q=dante
The POST method attaches the data after the URL and certain header information. The key word "POST" tells the server to expect more information after the header information has been read. This is the method that the W3C recommends. Sensitive information is not visible and secrets are not exposed. The POST method can handle long, elaborate postings.
Add the form tag to your HTML page like this:
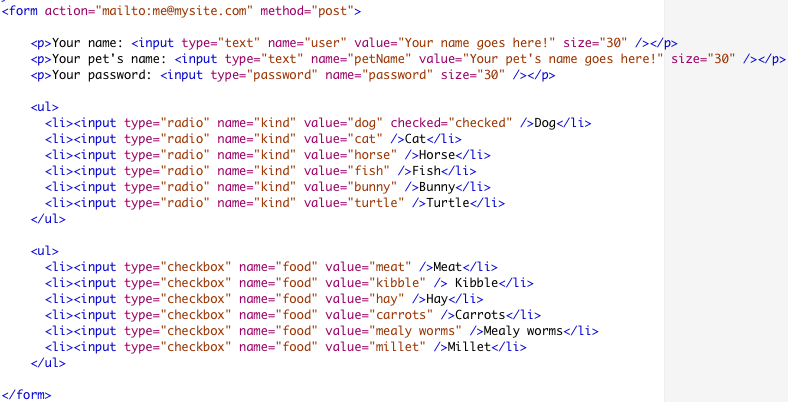
The form elements themselves are fairly simple to code. In our example let's provide fields for the user's name, the pet's name, and the user's password. For these tasks we'll use the <input> tag. The <input> tag is one of the few standalone tags.
The <input> tag always takes a "type" attribute to determine its behavior. Depending on what type is required the other attributes will vary. To create a text field we could write:
<input type="text">
The other attributes for the text type are:
Here is the signature of a simple text input control:
![]()
The attributes of a "password" type are similar -- the type attribute changes from "text" to "password". There is no point including a default text because it's just going look like a bunch of dots any way. The code for the password field looks like this:
![]()
Add input text fields for the user's name, the user's pet name and the users password to our form. Our code will look like this:

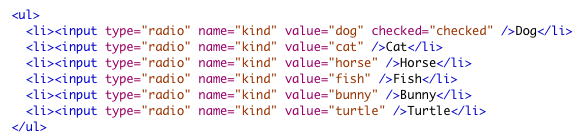
Radio buttons are a popular control to use with forms when you want the user to pick only one possibility. Expected behavior for radio buttons is to be able to choose only one.
Radio buttons are an <input> tag with type attribute set to "radio". The radio type takes the following attributes:
Here is what a radio button should look like that is the default value for a radio button group:
![]()
Here is a radio button that is not selected:
![]()
Notice the name in both cases is "kind", meaning the kind of animal. The name value is used by groups of radio buttons to force the "only one" behavior. If all the radio buttons have their name value set the same, then only one can be chosen. If the name value is set to different possibilities, then the user can choose as many as they like.
Here is the code for the kind of pet section. It is a block of radio buttons with the default set to "Dog".
SAVE!
Check boxes are similar to radio buttons in behavior. The difference is that the expected behavior is for check boxes to allow more than one to be selected. Only the value from the selected boxes is sent to the browser for processing.
The attributes for check boxes is the same as for radio buttons::
The code for the check boxes looks like this:
Here is an example of a check box:
![]()
When we add a group of check boxes to our form it looks like this:
SAVE!
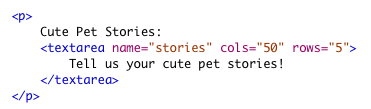
To create a text box with multiple lines for longer messages we use a <textarea> tag. The textarea tag wraps around a default message. The <textarea> tags take the following attributes:
Here is an example of the textarea tag:
Select Menus have several names. They are also called "pop up menus", "drop menus", "jump menus" or "scrolling menus". They are great for long lists that are tiresome to look at, like birth years, months, countries, counties and more. Select menus can display more than one option at a time. When they do, they are called scrolling menus. Like the text area, select menus require an opening and closing tag with the options in between.
The options define the elements in the menu. They also have an opening tag and a closing tag.
The select tags take the following attributes:
The option tag takes the following attributes:
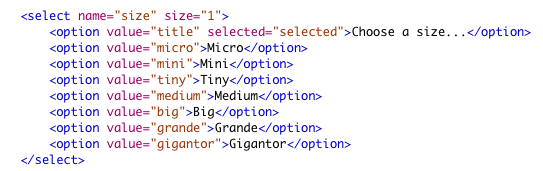
The code for the drop menu in the "size of your pet" section looks like this:
There are several different kinds of button controls. Two of the most important are the submit and the reset button. They do what their names say they do. The submit buttons sends the form, the reset button clears the form.
They are both <input> tags. The submit button has a type attribute of "submit", like this:
![]()
It has one attribute:
The reset button works the same way, only the value has been changed to "reset". It too takes the value attribute and uses it as the default label. Its code looks like this:
![]()
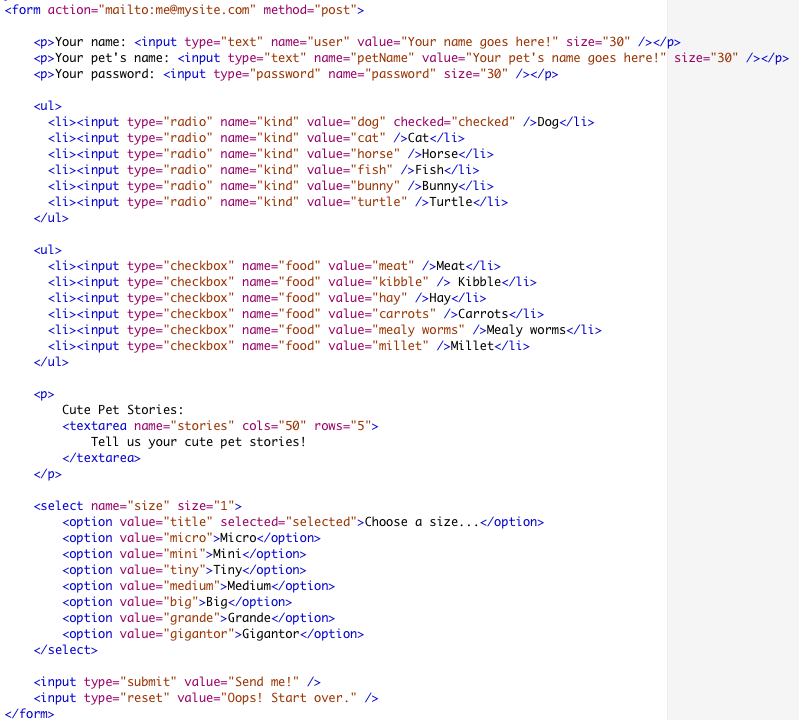
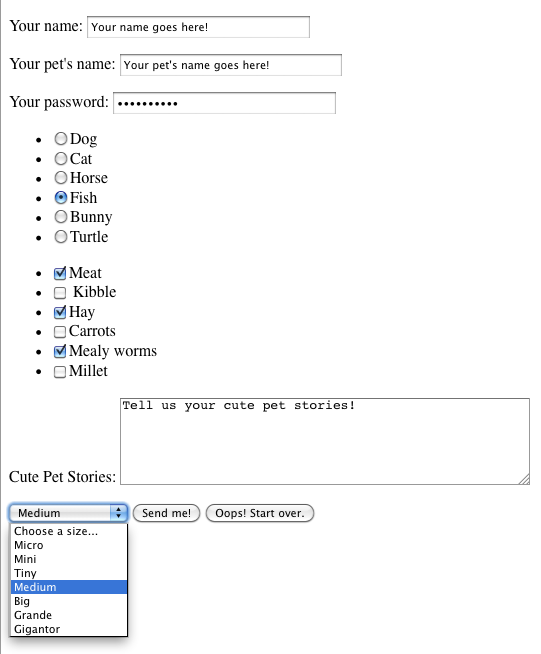
The form so far reads like this:
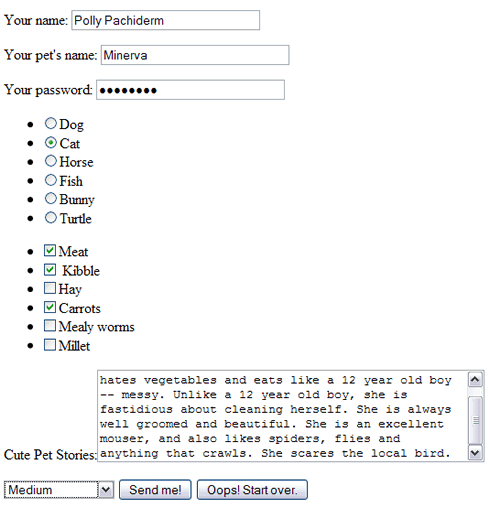
In the browser our completed code look displays like this:
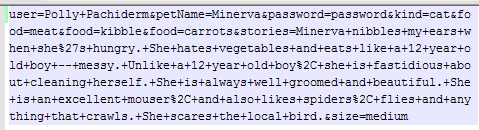
When we click the submit button, the browser tries to email the content to the email address provided in the actions attribute of the form tag. If we had provided a script it would have called the script instead. Here is what the raw, unprocessed data looks like:
Notice the form above was captured from Firefox running on a PC with XP installed. Below is the same form rendered in Firefox on a Mac running OSX. As you can see the browser, platform makes a big difference!
Our form is working well enough, but it could use a lot of improvement. There is a lot we can do to the code to make it more accessible to people who use non-visual browsers. HTML provides the fieldset and legend tags for creating logical groupings of the form controls in our code.
The fieldset tag is used to group together form controls that belong together. The legend tag is used to label those groupings. For instance, all our check boxes are related to a single question; it makes sense to group them together and give them a name.
In your text editor, go to File > Save as.. and resave your file as "m8_form2_yourlastname.html".
In our code above we can group our code as follows:
Adding the fieldset tag is simple -- you simply wrap the whole grouping. Adding a legend is also simple. Here is an example:

While we're at it, let's add a second select menu, but this time make it a scrolling menu like this:
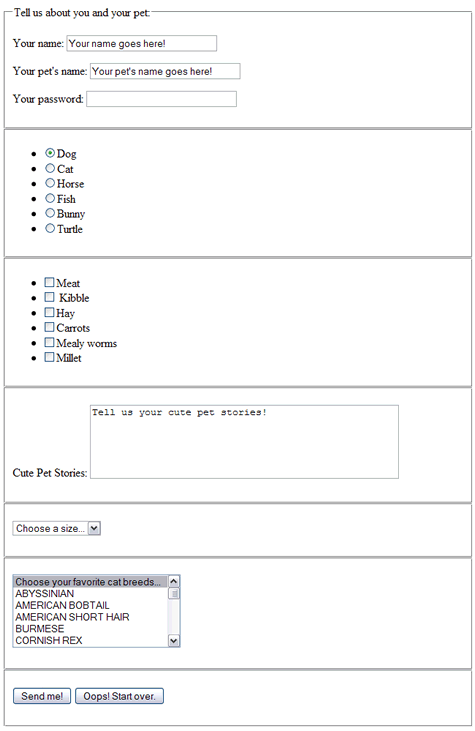
After adding fieldset tags our code looks a little different in the browser. All the fieldsets have keylines around them. It is also more accessible and more logical. Here is the completed page rendered on a PC:
There's no doubt about it -- our page is ugly. Fortunately we can style the form with CSS. All of the form controls can use the id and class attributes, and the form controls themselves can provide "hooks" for the CSS to hang on. What we would like to do is write a style sheet that unobtrusively cleans the page up and adds graphics to enliven the page. We want to keep our form code as clean as possible and avoid unnecessary markup.
The controls are visually grouped which is a good thing, but they all run together and look the same which is not a good thing. The submit and reset buttons in HTML are ugly and get lost on the page; we want to be able to make graphically rich buttons that really stand out and encourage the user to click. We want to be able to control the branding and the look and the feel of the page. Fortunately, this is no more complex than writing CSS for any other page.
For the purposes of the demonstration file we chose to make a form for the Cat Fancier's Club House. For your own demonstration, feel free to choose another topic. Design a form that suits your topic. Create graphics that go with your form.
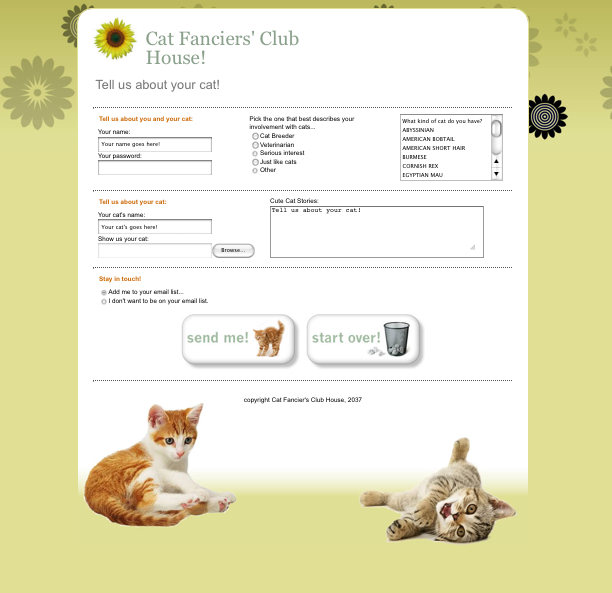
Here is the finished demonstration page:
First, let's review the graphics. The logo is nothing more than a simple JPG. It is going to be on a white background, so it should blend in seamlessly. It will be part of the header.
![]()
The background is also a simple JPG. This could have been a GIF because the art is essentially vector art, but the color ramp in the background looked "banded" in the GIF. The ramp adds an interesting touch. By setting the body color to be the lightest shade at the bottom of the graphic, we can repeat the graphic horizontally and give the feel of a seamless background that fades nicely. The width of this graphic has no effect on the page.

And of course, this is a site for cat fanciers so we need some cute kitties. Our content is going to be a container div with a controlled width of 900px that centers in the browser. The kitties anchor the bottom of the column. They will be attached to the footer. Since the column is 900px across, the kitties are 900px across.

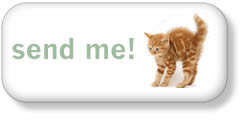
We don't want to our form to have nasty browser buttons, we want it to have fat, handsome graphic buttons that are related to cats. So, in that spirit, here is the graphic the demonstration uses for the send button:
and the reset button:

Open your template page and go to File > Save As and save your new file as "m8_form3_yourlastname.html".
We will need a container div, a header tag, a content div, a form tag and a footer. The container div will wrap the header, content div and footer. The content div will wrap the form.
Inside the header tag we can put the logo and an hgroup tag with the site name and a tag line as the h1 and h2 wrapped in an hgroup tag.
We are also going to use the venerable hr tag (hr stands for horizontal rule) to visually divide our page into sections.
So far our body tag looks like this:

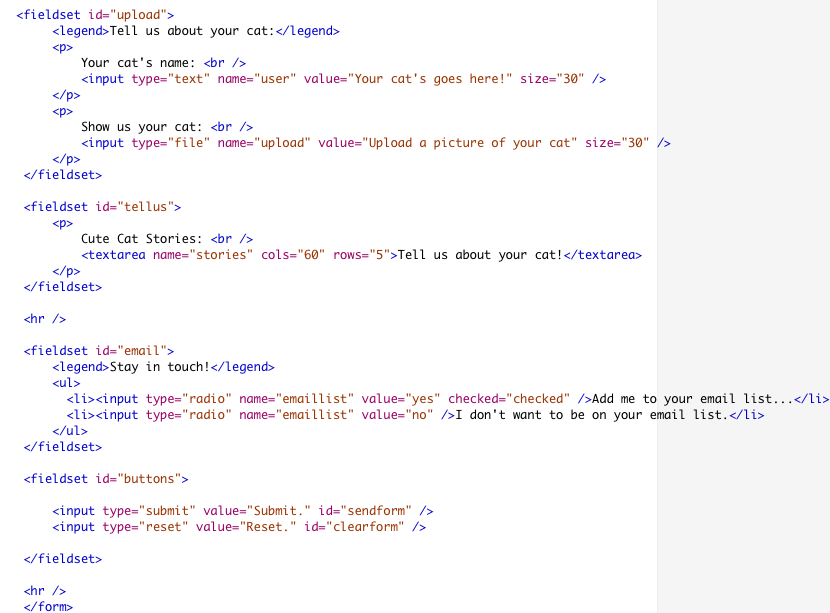
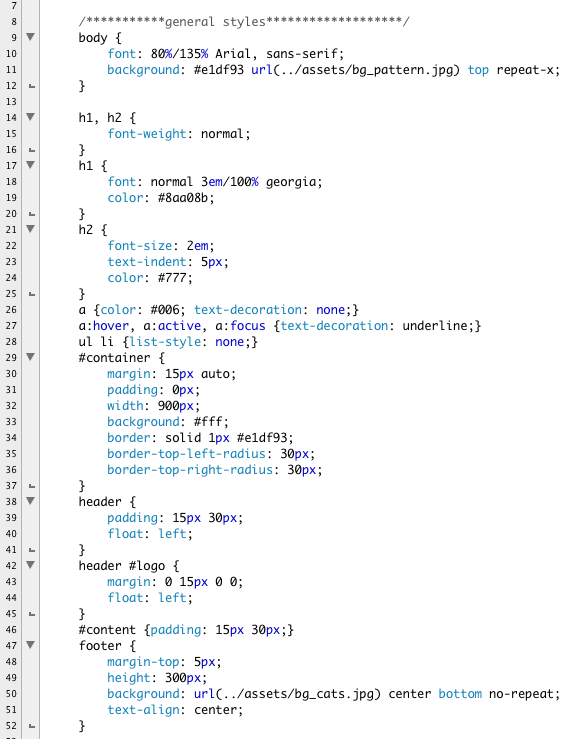
Now to complete the form. The controls the demonstration is using here are suggestions for the content. We are grouping the form controls into fieldsets. Give each fieldset a unique id. When appropriate, include the legend to establish a grouping on a related theme. Use hr tags to separate the themes.
The first fieldset has the id of "you". This fieldset collects the user's name and password. Here is the code:

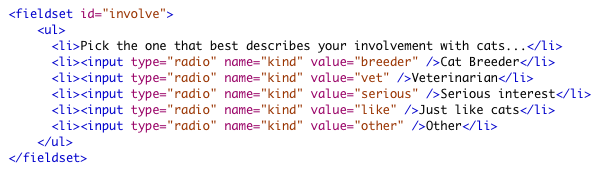
The next field set is a group of radio buttons where the user can identify their interest in cats. This fieldset is named "involve". The code looks like this:
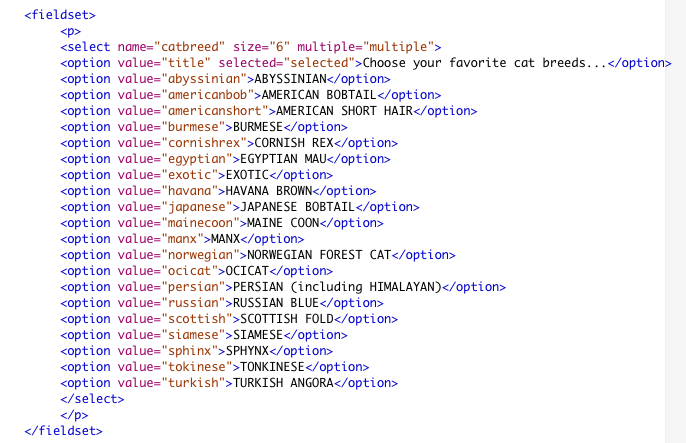
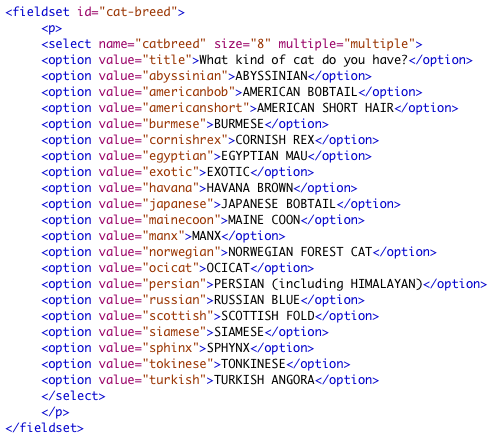
The next fieldset is select menu named "cat-breed". It contains the breeds of lots of different cats and is presented in the form of a list box. The list box shows six options at a time and allows the user to scroll to their option. Here is the code:
This ends one grouping so we add an hr tag. The next grouping begins with a new legend: "tell us about your cat". It collects the elements that help the user tell their stories.
The next fieldset is called "upload" and includes a text box for the user to enter their cat name and a text with a browse button that allows the user to upload a file -- in this case a picture of their cat. You would need a server side script to safely upload the image and re-size it and make sure it is free of viruses and such, but this is how you would provide the user's form control. The control is an input type with the type attribute set to "file". Like this:
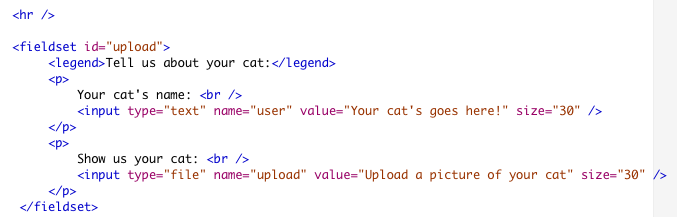
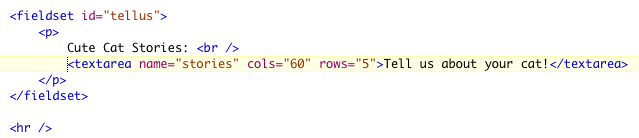
Everyone likes to share stories, so we include a textarea for everyone to share their cat stories. The fieldset is named "tellus". That ends this grouping so we add another hr tag.
We also are trying to get the users to sign up for our email letter, so we make two radio buttons and set the default to "Add me to your email list...". The fieldset is called "email".

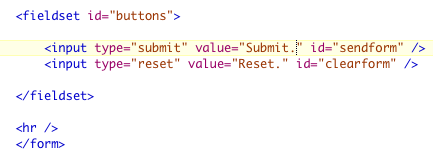
The last fieldset is "buttons" and it holds the submit and reset buttons.
Here is the completed form:

 SAVE!
SAVE!
Time to write the CSS!
Make a copy of shim.js that you used in Module 3, 4, 5 and 6. Save it into the js folder.
In you text editor, start a new file and save it to the css folder with the name "basic.css".
In the head of your HTML page add a script tag that points to the shim.js file.
Below it it link to the CSS file named basic.css that you just saved to the css folder.
The head of the HTML page should look like this:

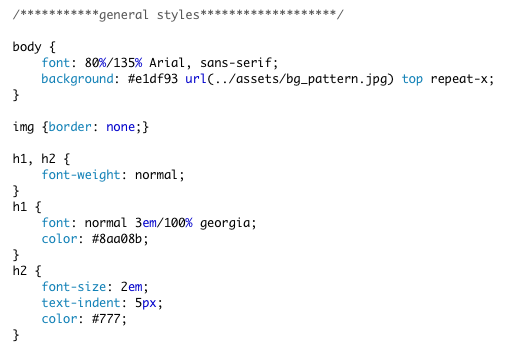
We can reuse the basic reset styles that we wrote in Module 4. Here it is again. It belongs at the top of your CSS:

Let's start with the general styles that we'll use to layout the basic HTML tags.
Using the body tag, we establish the font for our page as Arial. The background is tinted and a background graphic tiled across the top of the page in the horizontal direction.
We can also establish styles for our h1 and h2. Let's use the em measurement to make proportional header styles:
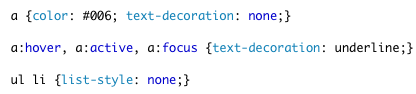
The a tag gets a simple treatment. It is tinted a medium blue and the underline removed. When the user mouses over, press down on the link or tabs into the link, the underline appears. The form doesn't actually have any text links but when we sat down to write the CSS we couldn't bare to leave it out! Years of coding enforces habits. The a tag just feels too important to leave undefined.
The list-style is removed from the list items:
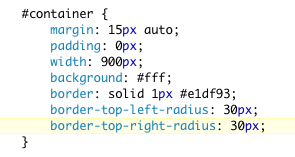
The container div is centered in the browser, given a width of 900px, a white background and a border tinted to match the background.
Just for fun, the top right and left corner have radius corners:
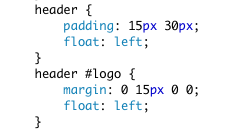
The header tag contains a floated element. To contain the float, we also float the header. The logo gets a bit right padding.
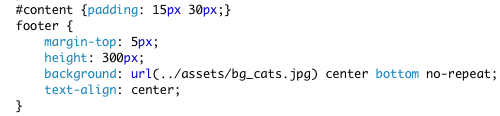
The content div needs a bit of margin to help it sit nicely in the page.
The style for the footer is fairly straight forward. Notice that the height of the foot is explicitly set to be 300px tall. This is to force the box open to show the cute cats. And they do look cute. Notice how the color ramp blends into the background bridging the container column and the body color.
Here are the completed style so far. These are the styles that pertain to our page layout:
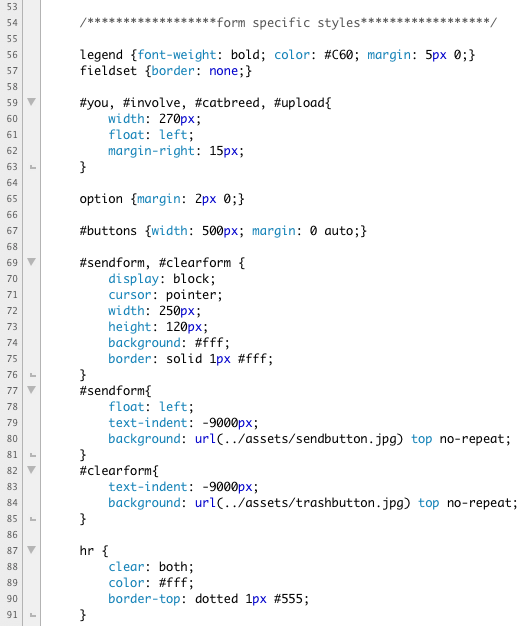
Now for the styles that are specific to our form. We can give the legends a special treatment since they are important labels for the different parts of the form. The code below sets the legends in a dark gold, gives it a bold font-weight and a bit of margin on the top and bottom.
We can also turn off the borders on the fieldset:

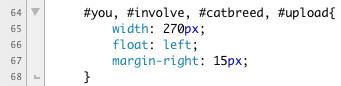
To reduce the length of the page, we can assign a width to sections of our form and float them to make better use of the horizontal space. Adding 15px of margin on the right keeps the sections visually separate.
The easiest thing to do is to use the ids to assign the style:
The option tags in the select menus look tight. They need a bit more vertical space. We can fix that with the margin property:
![]()
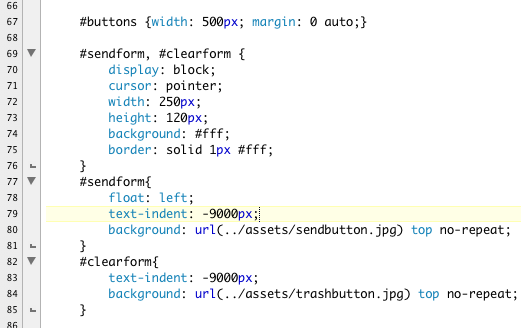
The send and reset button are best handled as a group. We give the group a width. The buttons we are using for the demonstration are wide, a 500px width will work for them, yours will differ. Then we center to grouping.
Each button needs to display as a block level tag, so we set the display property to block. Since our buttons are graphics we need to tell the cursor to treat them like buttons so that it displays the pointer hand when the user mouses over the graphic. This is an important visual cue. We use the cursor property and assign it the value of pointer.
![]()
We give each button width, height, a background color and border. Then we can assign each button it's individual graphic as a background image.
Additionally, we need to get the text off our buttons. We included the value attribute in the HTML because it is important for accessibility, but we don't have to visually display the text since the graphics are more than adequate to express what the buttons do. So we use a bit CSS trickery and set the text-indent property to be impossibly large, -9000px, and push the text off the screen to the right. This is a handy trick to know -- it allows you include text for accessibility and and still get a handsome graphic display.
Here are the relevant style:
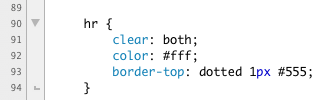
Finally, we need a treatment for our hr tag. The horizontal breaks also act to clear the floats:
And here are the completed styles for the form elements:
SAVE! Open you page in a browser.
Make two form pages. The first form page is a simple demonstration of your knowledge of the form controls. The first form must include the following controls:
- Text input
- Password box
- Radio button set of at least five elements
- Check box set of at least five elements
- A textarea box
- A select menu presented as either a list box or a drop menu with at least seven options
- A submit button and a reset button
Be sure to group your controls into fieldsets with legends when appropriate.
The second form must be a graphically rich page using CSS to control the look and feel of the page. The page must include at least five of the controls listed above and a file control. The submit and reset button must be graphics.
Validate your code. Make the necessary corrections. Upload your pages to your web server space and post the URLs in the Class Discussion.
The purpose of this assignment is to review the form tags and understand how to use form tags with CSS:
This assignment is due by the end of Module 8.
Place all of your files in a folder, and name the folder m8_yourlastname. Upload your folder to your server space. ZIP the local copy of your folder. Post the URL to the appropriate topic in the Class Discussion, and attach the ZIP of the folder.
Use the following file-naming convention:
- m8_yourlastname.zip
Description
For this project you will be building a portfolio of your work. The portfolio will serve as a vehicle for you to display your work as you progress through your degree program. You are building a website for yourself to display your growing skills. This portfolio will evolve over the course of your education. As you take more courses you will have more work to show.
This is a professional portfolio, and as such it is a more targeted site. You should select and carefully edit the work you want to show. This portfolio is a demonstration of your professional skills and judgment.
Your target audience includes your department director, instructors, classmates, and eventually, future employers. You will use this site as part of your mid-point review presentation. The committee will want to know more about you. They will need to see demonstration of your technical skills as well as your design skills. As you think about this portfolio, consider how you want to be perceived and design accordingly.
Your portfolio should include the following sections:
Final content and page list will vary somewhat from student to student -- the important thing is that the final piece fairly represents you.
A further consideration is that your portfolio is a "living" document. It is not a static brochure, but rather a growing, evolving site. As you think through the navigation, keep in mind that you will be updating this site in the future to include a growing body of work.
Each page must include:
If you already have a portfolio that you like and fits you well, you can propose to create another site, but you will need to show your site and get approval. Everyone in this program is required to have a web-based portfolio.
See DUE DATES section below for breakdown of individual module assignments.
Technical Requirement
This is a web-based portfolio. You should design using web "friendly" technologies. The site should be developed in HTML with external CSS and JavaScript. You may use Flash to enhance your site with animation and interactivity. This is an HTML class -- you may not build a Flash site. You may include sound files, video, animation, and anything else you feel will show your work off in its best light.
Purpose
Tools
Due Dates
Due Module 8: Define, Describe & Gather -- Begin collecting your content. Make a list of all the work you would like to show. Begin writing your resume, if you don't already have one. Write one paragraph that describes you as an artist. Write a second paragraph about what you would like your portfolio to do for you -- what would you like people to understand about you from viewing your portfolio?
Due Module 9: Finish collecting content and begin designing -- Continue to collect and refine your content. Make a list of all the different kinds of media your portfolio will need to accommodate. Begin grouping your content into categories. Start thinking about the hierarchy of your categories. Complete your resume.
Make a list of everything that must be on each page. Using the media of your choice, make your first design pass. You can use paper, pen and pencil or use your computer. Keep your designs flexible. Remember, this is just your first pass. Pick just three pages from your site to design -- don't try to do all of them. Be sure you have included everything that must be on every page.
Due Module 10: Redesign -- Using the feedback you received from your first design, re-work your site design. Pay particularly close attention to the navigation. Pay attention to the value range in your colors. Make sure there is enough contrast in the darks and lights.
Due Module 11: Complete design and begin coding -- Do any needed final tweaks on your design and begin coding. Validate your pages as you go. Separate the CSS out into external sheets and link to your external CSS. If you are going to need any special kind of interactivity, begin planning for it now. If you want to use some JavaScript or JavaScript Libraries, start looking the code you will need.
Due Module 12: Continue coding and begin production work on your content -- Continue making your pages and refining your code. Make any last tweaks to your designs as you code. Make sure all your pages validate.
Due Module 13: Finish coding and complete production work on your content -- Complete coding. Get as much working as you possibly can, even if it is rough.
Due Module 14: Final clean up, editing, submit -- Use this module to clean up any loose ends. This is the time to test your site and fix all the little snags and tidy up the messy bits.
Submission Directions
Put your files in a folder. Name your folder "m8_final_yourlastname". Upload your folder to your server. ZIP the local copy of your folder. Post the URL to the appropriate Class Discussion topic and attached the ZIP of the folder.